Showing posts with label SFDC. Show all posts

Monday, May 30, 2016

Crazy Mistakes in Force.com Development I - System.StringException: Invalid id

I have faced so many issues when I’m doing the development and could able to resolve almost all of them with the help of force.com developer forum and SFSE. When I’m thinking of the time I had to spend for them and the difficulties I have faced, I thought to share those problems as well as the appropriate solutions that I could made. Because I believe it may save some other developer’s time.
I’ll keep updating this post series time to time when I catch more other birds.

Prob: System.StringException: Invalid id tempStr

Possibilities:
1). Mostly this will happen when trying to assign query parameters into variables like below
If the value that has passed for accId is not in correct Id format, this exception will be thrown and hard to find out. It's better to assign the value to a variable type of String

or use try catch to validate properly

2). Also if you try to compare a variable type of Id with a String there's a chance of throwing this since the applied String is not in the standard Id format
To overcome this issue it can be used the string value of the Id to compare. 

Thursday, October 8, 2015

Crazy Mistakes in Force.com Development II - Validation Error: Value is not valid - Salesforce apex:selectList

I have used <apex:selectList /> many times but recently I had a trouble with it; onchange event not firing only for some values.

<apex:actionRegion id="salesItemActionRegion">
         <apex:outputLabel value="Sales Item : "></apex:outputLabel>
         <apex:selectList id="drpSalesItem" value="{!selectedProduct}" size="1" >
              <apex:selectOptions id="optnSalesItem" value="{!ProductList}"></apex:selectOptions>
              <apex:actionSupport rerender="pnlProductInfo" action="{!LoadProductDetails}" event="onchange" />
         </apex:selectList>
 </apex:actionRegion>

Below are the selectOptions when I put them in a debug statement.

System.SelectOption[value="value abc", label="value abc", disabled="false"],
System.SelectOption[value="value  def", label="value  def", disabled="false"],
System.SelectOption[value="value ghi", label="value ghi", disabled="false"]

onchange action is firing for first and third values but nothing happens for second value. It's not hitting the action LoadProductDetails but surprisingly there are no any script errors in the console. Wasted a day and put an <apex:pageMessages /> component inside pnlProductInfo which gets rerender from my <apex:actionSupport/>.

Wooooh! here it's


But what's the validation that's failing here? It's some salesforce server side validation that checks for selectList options. If you noticed, in my second selectOption value, there is a DOUBLE SPACE between the words. Replaced it with a single space and working perfectly!

Cheers!


Monday, July 13, 2015

Pagination in apex with StandardSetController

When record count get increased, typical solution for most common problems like page size getting large, render time getting increased is applying pagination. Salesforce has a powerful mechanism to introduce pagination into your data set easily, with StandardSetController.

Here how you'll do it.

Your controller
public with sharing class ControllerPagination {
    Public Integer noOfRecords{get; set;}
    Public Integer size{get;set;}
    public ApexPages.StandardSetController standardSetCtrl {
        get{
            if(standardSetCtrl == null){
                size = 10;
                string queryString = 'Select Name, Type, BillingCity, BillingState, BillingCountry from Account order by Name';
standardSetCtrl = new ApexPages.StandardSetController(Database.getQueryLocator(queryString));
standardSetCtrl.setPageSize(size);
                noOfRecords = standardSetCtrl.getResultSize();
            }
            return standardSetCtrl;
        }set;
    }
     
    Public List<Account> getAccounts(){
        List<Account> accList = new List<Account>();
        for(Account a : (List<Account>)standardSetCtrl.getRecords())
            accList.add(a);
        return accList;
    }
     
    public pageReference refresh() {
        standardSetCtrl = null;
        getAccounts();
        standardSetCtrl.setPageNumber(1);
        return null;
    }
}
Your VF Page
<apex:page controller="ControllerPagination">
    <apex:form >
        <apex:pageBlock id="pb">
            <apex:pageBlockTable value="{!Accounts}" var="a">
                <apex:column value="{!a.Name}"/>
                <apex:column value="{!a.Type}"/>
                <apex:column value="{!a.BillingCity}"/>
                <apex:column value="{!a.BillingState}"/>
                <apex:column value="{!a.BillingCountry}"/>
            </apex:pageBlockTable>
            <apex:panelGrid columns="7">
                <apex:commandButton status="fetchStatus" reRender="pb" value="|<" action="{!standardSetCtrl.first}" disabled="{!!standardSetCtrl.hasPrevious}" title="First Page"/>
                <apex:commandButton status="fetchStatus" reRender="pb" value="<" action="{!standardSetCtrl.previous}" disabled="{!!standardSetCtrl.hasPrevious}" title="Previous Page"/>
                <apex:commandButton status="fetchStatus" reRender="pb" value=">" action="{!standardSetCtrl.next}" disabled="{!!standardSetCtrl.hasNext}" title="Next Page"/>
                <apex:commandButton status="fetchStatus" reRender="pb" value=">|" action="{!standardSetCtrl.last}" disabled="{!!standardSetCtrl.hasNext}" title="Last Page"/>
                <apex:outputText >{!(standardSetCtrl.pageNumber * size)+1-size}-{!IF((standardSetCtrl.pageNumber * size)>noOfRecords, noOfRecords,(standardSetCtrl.pageNumber * size))} of {!noOfRecords}</apex:outputText>
                <apex:commandButton status="fetchStatus" reRender="pb" value="Refresh" action="{!refresh}" title="Refresh Page"/>
                <apex:outputPanel style="color:#4AA02C;font-weight:bold">
                    <apex:actionStatus id="fetchStatus" startText="Fetching..." stopText=""/>
                </apex:outputPanel>
            </apex:panelGrid>
        </apex:pageBlock>
    </apex:form>
</apex:page>

Thursday, June 25, 2015

Efficient SOQL For Loop

There are several governor limits to be considered when you are developing on Force.com platform. Among these, hitting the maximum number of queries allowed is the most common governor exception. Run time exception will be thrown as  System.Exception: Too many SOQL queries: 101.

This mainly occurs when you have put SOQL queries inside a loop as below.
for(Integer i=0; i<200; i++){
    Account act = [SELECT Id, Name FROM Account WHERE some_condition];
}


To avoid this you should somehow build the logic to meet the business matter and keep the query outside the loop.

Now the interesting part

Salesforce document says, "Developers should always use a SOQL for loop to process query results that return many records, to avoid the limit on heap size". What does this mean?

When you execute a standard SOQL query, it retrieve all the records while a for loop query does the same in chunks with SOAP API queryMore calls.


In addition to this, there are two formats of SOQL for loop in Force.com

  • Single sObject format where the for loop’s code block get executed once per sObject record(mostly used way).
  • sObject list format where the for loop’s code block get executed once per list of 200 sObjects

In this article what I need to highlight is the second format since it’s rarely seen in Force.com development. Have a look at the below snippet to get more clear idea
// keeping a savepoint so that transaction can be rolledback
Savepoint sp = Database.setSavepoint(); 

insert new Account[]{new Account(Name = 'AAA'), 
                     new Account(Name = 'AAA'), 
                     new Account(Name = 'AAA')};  //insert some data that can be identified

Integer i = 0;
Integer j;
for (Account[] tmp : [SELECT Id FROM Account WHERE Name = 'AAA']) {
    j = tmp.size();
    i++;
}
System.assert(j == 3); // The list should have contained the three accounts
                       // named 'AAA'
System.assert(i == 1); // Since a single batch can hold up to 200 records and,
                       // only three records should have been returned, the 
                       // loop should have executed only once

// Revert the database to the original state
Database.rollback(sp); 
Notes
  • You are safe to perform DMLs inside list format for loop queries than in a normal for loop
    query since the records are processed in chunks in list format (anyway this is not
    an encourage to perform DML inside a loop).
  • Since the queries having aggregate functions doesn't support queryMore function,
    you might get a runtime exception if you have such a query with more records in SOQL for loops.
  • When using the keyword ‘continue’ in list format for loops, it’ll skip to the next list
    of sObjects.

Friday, July 18, 2014

How to create a Salesforce.com Android Mobile app(hybrid_local)

This post assumes that you have already set up the development environment for Salesforce.com Mobile development. If you don't have, visit here and set it up first (for windows)

To connect the mobile application with your Salesforce.com instance, we need to create a some trusted connection between the app and target environment. Salesforce.com connected apps helps you here.
First we'll configure a connected app and then create the mobile app.

1). Login to your Salesforce.com instance and navigate into Setup ->  Create -> Apps,
2). Under Connected apps click on New
3). Fill the fields as required.
4). Under "API (Enable OAuth Settings)" tick the checkbox "Enable OAuth Settings".
5). Select the required OAuth scopes and click Save.
You should see the newly created Connected app something like below
Note that this Consumer key is going to do the main role to keep the connection between Salesforce.com and the app. Now it's time to create the mobile app. This post explain developing a hybrid_local app.

6). open a command prompt and run "forcedroid create"
7). Choose your options for each prompt. Below is a snap shot of what it has been chosen for this demo.

The command prompt output is itself describing the next steps.
After importing the projects into eclipse, open the MyFirstSFDCMobile/assets/www/bootconfig.json file. You have to update this file as below.
                        remoteAccessConsumerKey = Consumer key in your connected app
                        oauthRedirectURI = Call back URL of your connected app

Below is sample of bootconfig.json
{
    "remoteAccessConsumerKey": "my_consumer_key",
    "oauthRedirectURI": "sfdc://success",
    "oauthScopes": ["api refresh_token"],
    "isLocal": true,
    "startPage": "index.html",
    "errorPage": "error.html",
    "shouldAuthenticate": true,
    "attemptOfflineLoad": false,
    "androidPushNotificationClientId": ""
}

Done. Right click on MyFirstSFDCMobile and select Run As Android Project.
Have a look at index.html and inline.js inside www directory. These are the key files you have to modify to build your own application.

Cheers!

Salesforce Mobile Development

Salesforce.com has introduced their own Mobile SDKs to develop native, HTML5, hybrid mobile apps easily. There are some background works to be done before starting the development. Here is a quick overview of setting up the environment for Salesforce Mobile Development and next article we'll discuss how to build a Salesforce Android mobile app.

This is the home page for Salesforce.com Mobile SDK for Android (forcedroid) - https://github.com/forcedotcom/SalesforceMobileSDK-Android

There are couple of ways you can set up the SDK. Here it's described setting up with npm which is the quickest way as per the Salesforce.com itself.

First of all you should have Android development environment set up already. If you don't have it that's the first thing to do. It's fast and easy to use Android ADT bundle package which comes with the eclipse IDE+ADT as well as the Android SDK

1). Go to the command line and type "npm" and hit run to check whether npm has been already configured.

If it's showing above error, then you have to install and setup npm first. If you have npm configured in your machine you can jump into step 6.

2). Go to http://nodejs.org/download/ and download the compatible version with your platform (Windows installer 64bit in my case)

3). Run the downloaded installer and proceed installation.

4). Edit your PATH variable and add
;C:\Program Files\nodejs

5). Open a new command line and try "npm" again. You should see something similar below.
If you still having problems, check whether you have the node.js folder in your Program Files folder and double check the PATH variable.

6). In the command line, type "npm install forcedroid -g" and hit enter

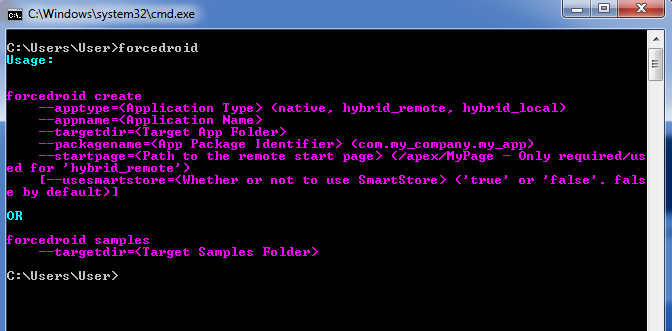
7). Almost done. Now again type "forcedroid" and hit enter to confirm the installation.

You can see the usage of forcedroid command such as types of apps that can be created. For more information visit forcedroid npm package home page.

Cheers!

Next Post : How to create a Salesforce.com Android Mobile app

Wednesday, January 23, 2013

Adding New Fields to an Existing Report Type in Salesforce - SFDC

In SFDC, one of very common complains from the new users is "Some of my fields are disappeared in Reports in SFDC". This is simply because you have not added those fields to the particular report type.

Just go to your report type and add the required fields and save. Follow these instructions.

  • Click Your Name|Setup|Create|Report Types
  • If the introductory message is there, click on Continue
  • Click on the Report Type which you need to edit
  • Click on Edit Layout in the Fields Available for Reports section
  • In the right hand side you can see all the fields of the objects in your report type.
  • Just select the Object from the drop down list in the View section.
  • Already added fields will be appeared as disabled
  • Select the Fields that you need to add and drop them into the section that you need(If there is no any section for your object, create a new section by clicking Create New Section button at the bottom).
  • After selecting all the required fields save the report type.

That's it. Cheers!!!

Last Modified Date in Salesforce - SFDC

This may be a somewhat silly thing to say to the outer world. But I thought to write this post, assuming that there is at least one people who is suffering from this problem ;)

 In SFDC for all the Standard objects as well as for the custom objects, there is a standard field called LastModifiedDate which is invisible in the field list. But if we are accessing these objects through API calls, then we can replicate this field as well into SQL Database or similar. There we can see that, the field is in DataTime format.

Even though the field is invisible in the field list, when we run a report on SFDC we can see that that field is available in the left panel. Ok, now I'll turn into the problem that I faced and the workaround.

I wanted to check the last modified time of each record(let say Opportunity object). But when I ran a report what the last modified date was giving is only the last modified date(as the name is saying itself ;) ). But I got to know that this field is in the type of DataTime. So, with following workaround, I could able to get the DataTime format of this field.

  • Add a new field to the particular object. In my case, for the Opportunity object.
  • Click on Your Name|Setup|Customize|Opportunities|Fields
  • Under Opportunity Custom Fields & Relationships, click on New 
  • Select the Formula as the Data Type of the field 
  • Give a name to the field and select DataTime as the Return Type and click Next 
  • In the Insert Field section, select the Last Modified Date 
  • Now this is your formula.In the formula area it should only appear LastModifiedDate 
  • That's it. Click Next and Follow the formal instructions if any. 

Finally go back to your report type and add the newly added field there. If you unfamiliar with adding a new fields to existing report type, have a look at here. It should now show the DateTime format of the LastModifiedDate field.