Monday, July 28, 2014

GoogleMap Custom Tooltip for Android with InfoWindowAdapter

When we are using Google Map services for Android application most of the times clients are expecting custom tooltips (markers contents) with more details and with more HTML formatting. This is a headache to developers. This post is describing a how to on this.

First create an layout xml file and place it under res > layout. This post is using a layout called "marker_window" as below. Goal hear is to view an HTML formatted detailed marker window with a name, address and some date value.
marker_window.xml
<?xml version="1.0" encoding="UTF-8"?>
<LinearLayout xmlns:android="http://schemas.android.com/apk/res/android"
    android:layout_width="wrap_content"
    android:layout_height="wrap_content"
    android:orientation="vertical">

    <TextView
        android:id="@+id/name"
        android:layout_width="wrap_content"
        android:layout_height="wrap_content" />

    <TextView
        android:id="@+id/address"
        android:layout_width="wrap_content"
        android:layout_height="wrap_content" />       

    <TextView
        android:id="@+id/report_date"
        android:layout_width="wrap_content"
        android:layout_height="wrap_content" />
   
    <TextView
        android:id="@+id/report_time"
        android:layout_width="wrap_content"
        android:layout_height="wrap_content" />
</LinearLayout>

This post assumes your map service activity is MapServiceActivity and google map instance is googleMap.
Add below code snippet in the MapServiceActivity wherever it needs to be refreshed(of course in the onCreate)
if (googleMap == null) {  
  googleMap = ((SupportMapFragment)getSupportFragmentManager().findFragmentById(R.id.map)).getMap();
  //if  you are using MapFragment instead of SupportMapFragment, alter the code appropriately,
  //googleMap = ((MapFragment) getFragmentManager().findFragmentById(R.id.map)).getMap(); 
}
googleMap.clear();

googleMap.setInfoWindowAdapter(new InfoWindowAdapter() {
  
  @Override
  public View getInfoWindow(Marker marker) {
    // TODO Auto-generated method stub
    return null;
  }
  
@Override
public View getInfoContents(Marker marker) {
    View view = getLayoutInflater().inflate(R.layout.marker_window,null);
    TextView locationView = (TextView)view.findViewById(R.id.name);
    TextView addressView = (TextView)view.findViewById(R.id.address);
    TextView dateView = (TextView)view.findViewById(R.id.report_date);
    TextView timeView = (TextView)view.findViewById(R.id.report_time);
   
    String formatLocator = "<b>Locator:</b> "+name;
    String formatAddress = "<b>Address:</b> "+addressText;
    String formatDate = "<b>Report date:</b> "+reportDate;
    String formatTime = "<b>Report time:</b> "+reportTime;
    //Likewise you can introduce some HTML formatting to the content
   
    locationView.setText(Html.fromHtml(formatLocator));
    addressView.setText(Html.fromHtml(formatAddress));
    dateView.setText(Html.fromHtml(formatDate));
    timeView.setText(Html.fromHtml(formatTime));
   
    return view;
  }
});

Done.
Below is a screen shot of what you can see of.

Friday, July 18, 2014

How to create a Salesforce.com Android Mobile app(hybrid_local)

This post assumes that you have already set up the development environment for Salesforce.com Mobile development. If you don't have, visit here and set it up first (for windows)

To connect the mobile application with your Salesforce.com instance, we need to create a some trusted connection between the app and target environment. Salesforce.com connected apps helps you here.
First we'll configure a connected app and then create the mobile app.

1). Login to your Salesforce.com instance and navigate into Setup ->  Create -> Apps,
2). Under Connected apps click on New
3). Fill the fields as required.
4). Under "API (Enable OAuth Settings)" tick the checkbox "Enable OAuth Settings".
5). Select the required OAuth scopes and click Save.
You should see the newly created Connected app something like below
Note that this Consumer key is going to do the main role to keep the connection between Salesforce.com and the app. Now it's time to create the mobile app. This post explain developing a hybrid_local app.

6). open a command prompt and run "forcedroid create"
7). Choose your options for each prompt. Below is a snap shot of what it has been chosen for this demo.

The command prompt output is itself describing the next steps.
After importing the projects into eclipse, open the MyFirstSFDCMobile/assets/www/bootconfig.json file. You have to update this file as below.
                        remoteAccessConsumerKey = Consumer key in your connected app
                        oauthRedirectURI = Call back URL of your connected app

Below is sample of bootconfig.json
{
    "remoteAccessConsumerKey": "my_consumer_key",
    "oauthRedirectURI": "sfdc://success",
    "oauthScopes": ["api refresh_token"],
    "isLocal": true,
    "startPage": "index.html",
    "errorPage": "error.html",
    "shouldAuthenticate": true,
    "attemptOfflineLoad": false,
    "androidPushNotificationClientId": ""
}

Done. Right click on MyFirstSFDCMobile and select Run As Android Project.
Have a look at index.html and inline.js inside www directory. These are the key files you have to modify to build your own application.

Cheers!

Salesforce Mobile Development

Salesforce.com has introduced their own Mobile SDKs to develop native, HTML5, hybrid mobile apps easily. There are some background works to be done before starting the development. Here is a quick overview of setting up the environment for Salesforce Mobile Development and next article we'll discuss how to build a Salesforce Android mobile app.

This is the home page for Salesforce.com Mobile SDK for Android (forcedroid) - https://github.com/forcedotcom/SalesforceMobileSDK-Android

There are couple of ways you can set up the SDK. Here it's described setting up with npm which is the quickest way as per the Salesforce.com itself.

First of all you should have Android development environment set up already. If you don't have it that's the first thing to do. It's fast and easy to use Android ADT bundle package which comes with the eclipse IDE+ADT as well as the Android SDK

1). Go to the command line and type "npm" and hit run to check whether npm has been already configured.

If it's showing above error, then you have to install and setup npm first. If you have npm configured in your machine you can jump into step 6.

2). Go to http://nodejs.org/download/ and download the compatible version with your platform (Windows installer 64bit in my case)

3). Run the downloaded installer and proceed installation.

4). Edit your PATH variable and add
;C:\Program Files\nodejs

5). Open a new command line and try "npm" again. You should see something similar below.
If you still having problems, check whether you have the node.js folder in your Program Files folder and double check the PATH variable.

6). In the command line, type "npm install forcedroid -g" and hit enter

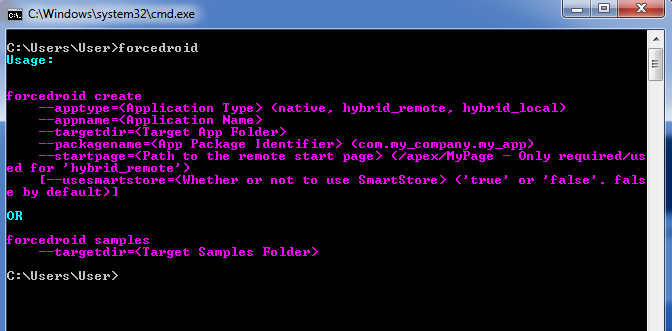
7). Almost done. Now again type "forcedroid" and hit enter to confirm the installation.

You can see the usage of forcedroid command such as types of apps that can be created. For more information visit forcedroid npm package home page.

Cheers!

Next Post : How to create a Salesforce.com Android Mobile app